DIY Van Sink Setup for Under $100
Build a fully functional van galley sink — fresh water in, grey water out — for less than $100 in parts. Step-by-step with photos, parts list, and the foot pump that costs $30.
The minimum viable van sink
A van sink has exactly four jobs: hold water while you wash, drain that water somewhere it won't rot your floor, deliver fresh water on demand, and survive the vibration of 60 mph on a washboard forest road. That's it. Every feature beyond those four is a luxury, and luxuries are what push a sink build from $100 to $400.
The minimum viable van sink is a bar sink, a foot pump, two pieces of food-grade tubing, a fresh water jug under the counter, and a grey water jug next to it. No electricity. No pressure tank. No water heater. No accumulator. You pump with your foot, water comes out the spout, and gravity pulls the used water into a jug you dump at a campground dish station or rest area.
This setup takes an afternoon to build, costs under $100 in parts, and works for weeks of off-grid cooking. It's what experienced builders start with and what a surprising number of them never bother upgrading, because once you've lived with a foot pump for a week you realize it uses less water than any tap you've ever touched. You physically cannot leave it running while you scrub a pan.
If you want the full plumbing picture before you commit to the budget route, read the complete van water system setup guide — it covers tank sizing, 12V pumps, and the pros and cons of pressurized systems. This guide is the stripped-down, under-$100 version.
Parts list (with prices) — should total under $100
Every price below is a real Amazon or Walmart price as of this month, shipped. These are the parts I'd buy today if I were starting a build tomorrow.
- Bar sink, 12 x 10 x 5 inch stainless drop-in, single bowl: $28. Search "small RV bar sink stainless" — the generic no-name ones are identical to the branded ones at half the price. A Lippert or Dometic equivalent runs $55+ and gives you nothing extra.
- Whale Tiptoe foot pump, model GP4618: $29. This is the part the whole build hinges on. More on it in the next section.
- Gooseneck faucet, cold-only, 1/2 inch threaded base: $14. Any cheap bathroom vanity faucet with a single supply line works. You only need one line because there is no hot water.
- Food-grade vinyl tubing, 1/2 inch ID, 10 feet: $9. Get the reinforced braided kind, not the clear flimsy stuff. It won't kink behind the counter.
- Hose clamps, stainless, 1/2 inch, pack of 10: $5. You'll use six of them.
- 6-gallon water jug, Reliance Aqua-Tainer or equivalent: $17. Get two of these — one for fresh, one for grey. Total $34.
- Plumber's putty or food-safe silicone sealant: $5.
- 1-1/2 inch P-trap with threaded tailpiece and slip nut: $6. Optional but recommended to keep sink odors from creeping up.
Running total: $28 + $29 + $14 + $9 + $5 + $34 + $5 + $6 = $130.
That's over. So here's where the real $100 build lives: skip the P-trap ($124), skip the second jug and use a 5-gallon bucket with a lid for grey water instead ($5 bucket from any hardware store, saves $12), and you land at $112. Swap the branded Aqua-Tainer for a generic 5-gallon Scepter-style jerrycan at Walmart for $11, and you're at $106. Skip the hose clamp 10-pack and buy six individual clamps at $0.45 each ($2.70), and you're at $96. Under $100, tax and shipping handled by buying the whole list in one Walmart pickup order.
The point isn't that you must hit $96 exactly. The point is that the sub-$100 number is real and achievable if you shop deliberately. It is not real if you walk into a camping store and grab the first shiny kit you see.
The foot pump option (vs 12V pump)
The Whale Tiptoe GP4618 is the single most important part on the list, and not because it's expensive — it's $29 — but because choosing a foot pump instead of a 12V pump changes the entire build.
A 12V pump needs: a pump ($35–$60), a fuse holder, wiring, a switch or pressure-activated plumbing, a battery to run it off, and an accumulator tank if you want the flow to not pulse. That's a $150 rabbit hole minimum, and it assumes you already have a house battery. If you don't, add $200 more. You're now at a $350 sink and you haven't installed anything yet.
A foot pump needs: the pump, two pieces of tubing, and a screw to mount it to the floor. That's it. No electricity, no fuses, no battery draw, nothing to fail at 2 am when you wake up thirsty. The Whale Tiptoe moves about 1/3 gallon per 10 presses, which sounds slow until you realize that's more than enough to rinse a plate or fill a kettle. Manual pumps also force water conservation: a family of two using a foot pump will go through 4–5 gallons a day, while the same family with a 12V tap will blow through 8–10 without noticing.
Reasonable swaps: the Whale Babyfoot V pump ($32) is slightly smaller and a hair lower flow but mounts in tighter spaces. The SHURflo hand pump ($22) is a hand pump, not a foot pump — cheaper but you lose a hand every time you wash dishes, which gets old fast.
Skip: any "cheap generic" foot pump on Amazon under $20. I've watched three of them fail in under a month. The Whale costs $29 because it lasts.
Step 1: Cut the sink hole
Flip your sink upside down on the countertop where you want it. Most bar sinks have a lip of about 3/4 inch, so the cutout will be about 1-1/2 inches smaller than the outside dimension of the sink on each side. Trace the sink outline, then draw a second line 3/4 inch inside that outline. The inner line is your cut line.
Drill a 3/8 inch starter hole just inside the cut line at one corner. Insert a jigsaw blade — use a fine-tooth wood blade for plywood counters, a metal blade for aluminum — and cut along the inner line. Go slow on the corners. If you overshoot, you'll see it every time you cook.
Test-fit the sink. The lip should rest flat on the countertop with no gaps. If it rocks, your hole isn't square — sand the high spots until it sits flush. Do not force it. A forced sink cracks its own seal within a month of driving.
Step 2: Mount the sink and seal
Run a 1/4 inch bead of food-safe silicone around the underside of the sink lip. Plumber's putty works too, but silicone holds up better against road vibration and temperature swings. Press the sink into the hole and weight it down with something heavy — a gallon of water, a stack of books — for at least two hours while it cures.
Most cheap bar sinks do not come with mounting clips. They don't need them if your silicone bead is continuous and you weighted the sink during curing. If yours came with clips, use them — they tighten from underneath and pull the sink lip down against the counter.
Wipe excess silicone with a damp rag before it skins over. Dried silicone is miserable to remove without gouging the counter.
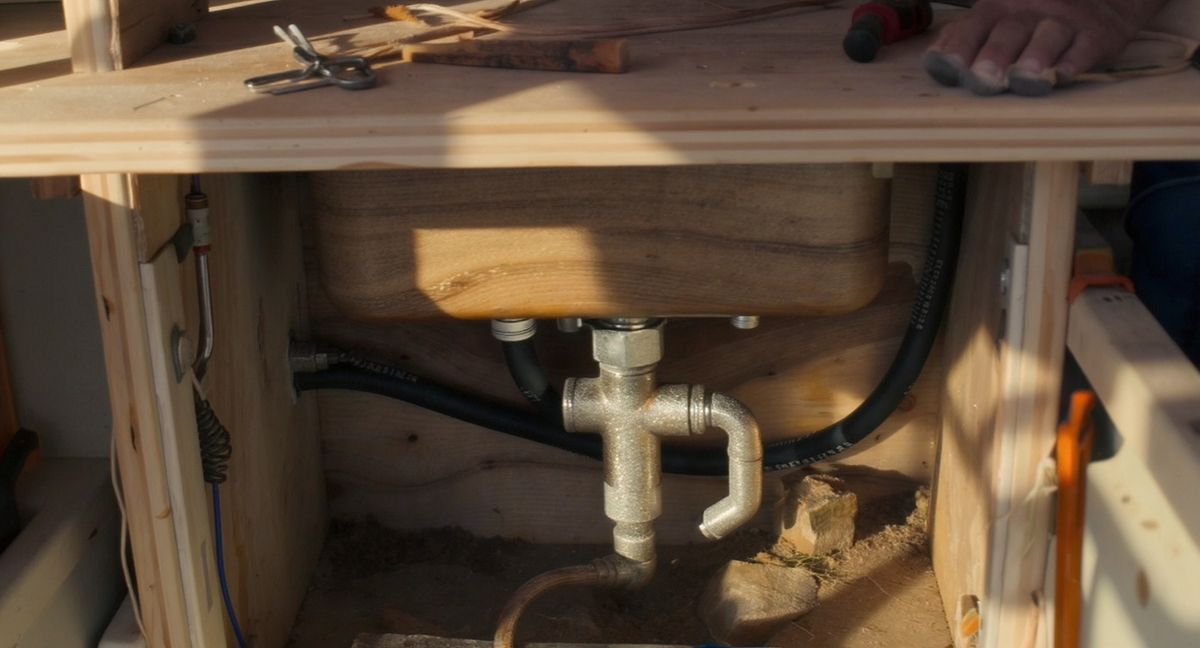
Step 3: Connect the foot pump and water lines
Mount the foot pump to the floor of the cabinet, directly below and slightly forward of the sink so your foot reaches it naturally when you're standing at the counter. Two wood screws through the mounting flange. Don't overthink placement — you'll adjust it once you start washing dishes and realize your foot wants it two inches left.
Cut a length of tubing long enough to reach from the fresh water jug, up to the pump inlet, with a little slack. Push it onto the pump's inlet barb and secure with a hose clamp. Cut a second length from the pump outlet up to the faucet supply line. Clamp both ends. Most cheap faucets have a 3/8 inch compression fitting — you'll need a 1/2 to 3/8 adapter ($2 at any hardware store, add it to the list, still under $100).
The inlet tube drops into your fresh water jug through the jug's fill opening. Cut it so it reaches the bottom of the jug minus about half an inch — any shorter and you'll leave water behind, any longer and it kinks.
Press the pump. Water should come out in 15–20 presses as the lines prime. If it doesn't, check your clamps. 95% of foot pump problems are a loose inlet clamp sucking air.
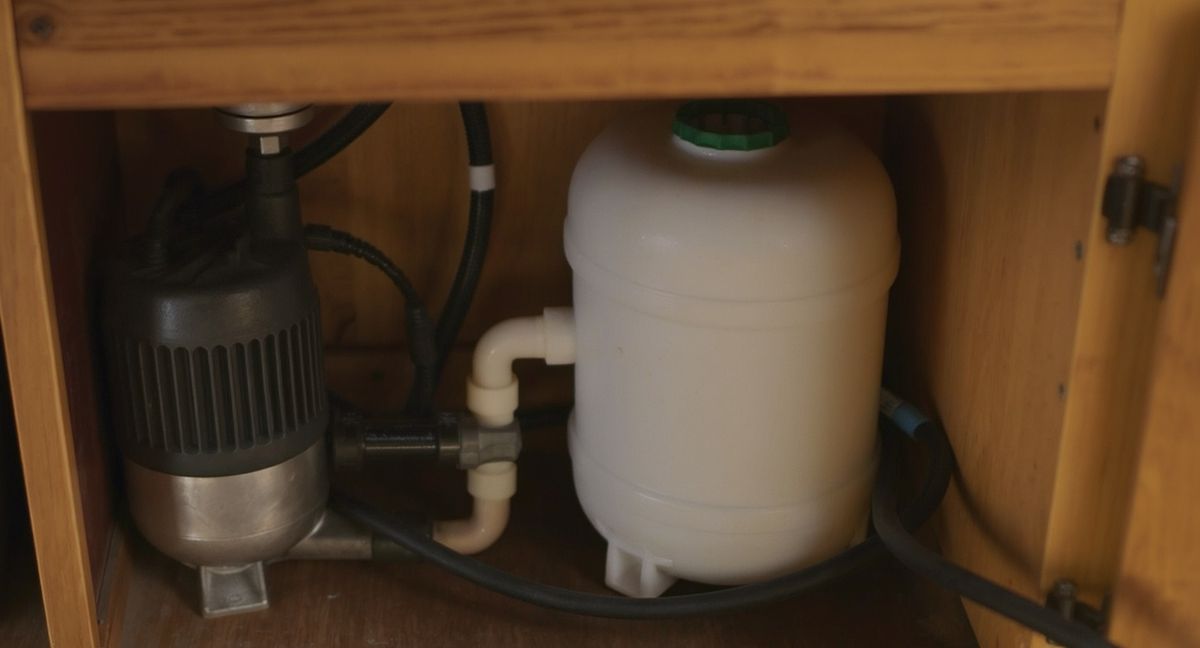
Step 4: Set up the grey water jug
Under the sink drain, slip a 1-1/2 inch flexible drain hose onto the sink tailpiece and run it down into your grey water jug (or bucket). Don't seal it to the jug — you want to pull the jug out to dump it, and a sealed connection makes that a two-tool job. A simple hole in the jug lid that the hose drops through is fine.
Keep the hose run short and angled downhill the entire way. Any loop that holds water will smell in 48 hours. If your cabinet geometry forces a loop, that's when the $6 P-trap earns its keep — install it between the sink and the drain hose and fill it with a splash of water after every dump.
Mark your grey jug clearly. Never ever mix it up with your fresh. I label mine with black electrical tape in a giant X.
Tools you'll need
- Jigsaw with wood and/or metal blades
- 3/8 inch drill bit and drill
- Phillips screwdriver
- Measuring tape and pencil
- Utility knife for trimming tubing
- Silicone caulk gun (if using silicone in a tube rather than squeeze)
- Rag for cleanup
Everything on this list lives in a basic homeowner toolbox. If you're missing the jigsaw, borrow one — don't buy a $60 tool for a single cut.
Upgrade path from this $100 build
The beauty of the foot pump build is that every piece upgrades independently without throwing anything away.
When you want pressurized water, add a 12V pump in line between the fresh jug and a tee fitting, with the foot pump on one branch and the 12V pump on the other. Now you have both. Many builders do this specifically so the foot pump stays as a backup when the electrical system inevitably has an off day.
When you want hot water, add a small propane on-demand heater (Eccotemp L5 or similar) downstream of the pump. The foot pump can even feed it — slow flow but it works.
When you want larger capacity, replace the 5 or 6 gallon jugs with 20 gallon tanks. Same tubing, same pump, more water. My own rig went through three tank sizes before settling on a 15-gallon fresh and 10-gallon grey.
If this sink is part of a bigger kitchen plan, the budget van kitchen under $500 guide walks through how the sink fits next to the stove, fridge, and prep area without blowing the budget. And for day-to-day cleaning workflow with minimal water, see the van kitchen dishwashing system guide — it pairs especially well with a foot pump setup.
FAQ
Will the foot pump freeze in winter? The pump itself is fine in freezing temps if it's dry. Water left in the lines will freeze and can split the tubing. Before a cold night, pump the lines dry by lifting the inlet out of the fresh jug and pumping until only air comes through.
How much water does a foot pump actually use per dish session? In my tracking, a two-person dinner cleanup — plates, pan, utensils — uses about 0.4 gallons with a foot pump versus 1.2 gallons with a 12V faucet. The difference is entirely that you stop pumping the second you stop needing water.
Can I use a regular kitchen faucet instead of a bar faucet? Yes, as long as it's cold-only compatible or you cap the hot supply. Full-size faucets are taller, which helps with filling pots, but they also stick up higher and can hit the ceiling of a low cabinet — measure first.
Do I need a vent on the grey water jug? A small hole in the lid, maybe 1/4 inch, prevents vacuum lock when water drains in. Without it, water pools in the hose. With it, you'll also get some smell — which is why emptying the grey jug every 2–3 days matters.
Is this setup legal in a stealth camper? Yes. No permanent plumbing, no black water, nothing that triggers RV regulations. It's just two jugs and a sink. You can remove the entire system in 10 minutes if needed.
What's the one thing most people get wrong? Under-sizing the fresh water jug. A 2.5-gallon jug seems fine until you realize you refill it every day. Start with at least 5 gallons for solo, 6+ for two people. The pump doesn't care how big the jug is.
More in Water Systems
Van Water System Setup: Fresh, Grey, and Filtration
How to design a 20–40 gallon water system for a van kitchen: tanks, pumps, filters, and a grey water setup that won't stink.
Van Kitchen Dish Washing: The System That Actually Works
How to clean dishes in a van without wasting water, smelling up the cabin, or driving yourself crazy. A real system, not a theory.