Van Kitchen Storage Solutions That Actually Work
Pantry bins, magnetic spice racks, drawer systems, and the organization hacks that survive washboard roads.
Why van kitchen storage is different
Storage in a van kitchen is fundamentally different from storage in a house. A house kitchen assumes gravity works, drawers stay closed, and dishes don't try to escape. A van kitchen assumes you're driving on washboard dirt roads at 35 mph, taking 3-degree tilts in parking lots, and opening cabinets that were at 70°F this morning and will be at 105°F by afternoon. Every storage decision in a van has to survive motion, temperature swings, and tight space — all at the same time.
This guide covers the storage solutions that actually work in van kitchens after thousands of miles of real-world use: the pantry systems, the spice racks, the cookware organization, the dry goods containers, and the small hacks that separate kitchens you hate from kitchens you love. Most of what's in here is cheap. None of it is fancy. All of it has been road-tested.
The core principle: vertical space is free, horizontal is expensive
In a van, horizontal surfaces (countertop, drawer bottoms, floor) are expensive because they're limited and shared with cooking, prep, and walking around. Vertical surfaces (cabinet walls, backsplash, door interiors) are almost always underutilized and free to use.
Every storage decision should ask: "Can this go on a wall instead of taking up counter or drawer space?" If yes, put it on the wall. This single principle drives most of the solutions below.
Spices: the first test case
Spices are the perfect example of the vertical-vs-horizontal tradeoff. A traditional spice rack on a counter eats 12 x 6 inches of horizontal real estate. In a van, that's 15% of your prep counter — unacceptable.
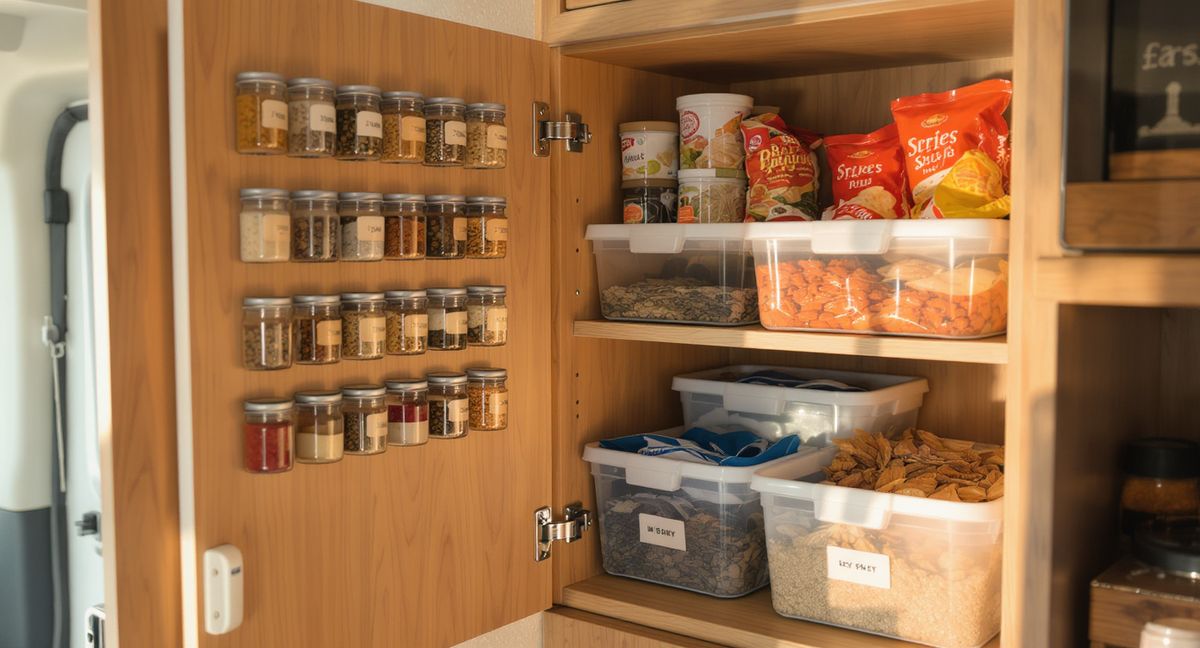
The right solution is magnetic jars on a wall-mounted steel plate. The Gneiss Spice magnetic spice rack review covers this in detail, but the short version: 24 glass jars with neodymium magnets stick to a 13x9-inch steel plate. Mount the plate inside a cabinet door or on any flat vertical wall. Zero counter footprint. Jars survive rough roads because the magnets are rated at roughly 4 lbs of pull per jar.
DIY alternative: Mason jar lids with glued neodymium discs on a steel sheet. Works, takes a weekend, saves $50. Not as clean-looking as the Gneiss system but functionally equivalent.
What to avoid: clip-on plastic racks, in-drawer spice organizers, tiered countertop spice bottles. All of these fail in vans — clips break, drawers get disorganized, bottles tip over on washboard.
Dry goods pantry: the three-tier system
Dry goods (rice, pasta, beans, flour, oats, nuts, coffee, sugar) are bulky and benefit from a tiered storage system based on access frequency:
Tier 1 — Daily use (eye-level cabinet, front-facing):
- Coffee beans/grounds
- Sugar/honey
- Salt and pepper
- Cooking oils
- Bread or tortillas (in the current rotation)
Tier 2 — Weekly use (mid-level cabinet or under-bench storage):
- Rice, pasta, lentils, beans
- Canned goods (tomatoes, coconut milk, beans)
- Granola, oatmeal
- Nuts and dried fruit
Tier 3 — Backup stock (deep/hard-to-reach storage):
- Extra rice and dry staples
- Backup canned goods
- Spare cooking oils
- Emergency food
For tiers 2 and 3, gasketed plastic bins are the right answer. The Iris Weathertight Storage Set review covers the budget option at $119 for six bins; the Front Runner Wolf Pack Pro is the premium overlander choice at $69 per bin. Both lock dust out, stack securely, and survive rough road use.
The bin approach wins because:
- Containment: a dry-goods spill in a bin is annoying; a dry-goods spill loose in a cabinet is a disaster.
- Visibility: clear bins let you see contents without opening them.
- Portability: pulling a bin out to access contents is faster than digging through a cabinet.
- Modularity: you can rearrange bins as your pantry grows.
Cookware: stack, nest, or magnet
Cookware in a van has three realistic storage strategies:
Nesting cookware sets. The Magma Nesting 10-piece or Stanley Adventure Base Camp approach — a full kitchen worth of pots and pans collapsing into a single 10-inch stack. This is the winning strategy for most van builds. Pay once, save 70% of cabinet space.
Stacking with dividers. If you have mismatched pots from a previous life, use pan separators (thin felt pads or silicone dividers) between them and stack vertically in a deep drawer or cabinet. Cheaper than buying nesting sets but less space-efficient.
Wall-mounted (magnetic or hook). Lids especially benefit from wall mounting — a 12-inch lid is awkward in any cabinet but easy on a hook. Pot lids can hang on small hooks mounted inside cabinet doors. Metal utensils can hang on a magnetic strip mounted over the counter (out of cook's way).
What to avoid: open pot racks visible from outside the van (looks messy and things fall during transit), deep bins that force you to unload everything to get to the bottom pot.
Utensils: the single-drawer rule
A van kitchen needs one organized utensil drawer, not three disorganized ones. Ten to fifteen utensils cover 95% of cooking: one chef's knife, one paring knife, one serrated bread knife, one wooden spoon, one silicone spatula, one slotted spoon, tongs, a whisk, a can opener, a vegetable peeler, a measuring cup, measuring spoons, and a flexible cutting board.
Everything beyond that list is a luxury. You do not need three spatulas, two whisks, and a specialized garlic press in a van. Cull aggressively.
The right drawer is 12–18 inches wide, 3–5 inches deep, with integrated dividers or a bamboo organizer tray. Add non-slip drawer liner ($6 at any home store) under the tray to keep things from sliding during drives.
Knife storage specifically: never loose in a drawer. Either (a) magnetic knife strip mounted on a wall at eye level (not above the cook), (b) in-drawer knife block with slots, or (c) individual blade guards on each knife. Loose knives in a moving van are genuinely dangerous.
Fridge organization
The fridge has its own organization problem. A 35L compressor fridge in a van holds much less than a house fridge, and everything needs to stay put on bumpy roads.
Rules for van fridge organization:
- Rigid containers for leftovers, not loose plates with foil. Pyrex, stainless, or silicone-sealed plastic. They stack and don't tip.
- Soft-body items (vegetables, greens, herbs) in the top layer where they're visible and accessible.
- Heavy items (drinks, condiments, canned goods) in the bottom for center of gravity.
- Eggs in a dedicated egg box, not in their original cardboard container. Cardboard degrades in humidity.
- Nothing loose that can roll. Every round object (tomatoes, lemons, onions) goes into a container or mesh bag.
For top-opening fridges (most compression fridges), the basket organization matters more than anything else. Divide the basket with cardboard or plastic inserts so items stay in zones and don't shift.
Cutting boards and flat storage
Flat items — cutting boards, cooling racks, sheet pans, trivets — are awkward because they don't nest. The right storage is a vertical slot organizer in a cabinet, mounted with adhesive strips or wood glue. Each item slides in vertically and stays separated. Under $20 in materials, eliminates the "cutting board falling out every time I open the cabinet" problem.
Trash and recycling
Most van kitchens forget trash storage until the trash is overflowing on the counter. Build a dedicated pull-out trash bin into the galley from the start. A 5-gallon bucket with a snap lid works fine. Line it with a kitchen bag. Empty every day — van trash compounds fast because of food smells in an enclosed space.
Recycling is harder because you have to store it until a drop-off. A separate bin or collapsible bag for cans and glass is reasonable; paper and cardboard can usually go in the regular trash unless you're in a strict deposit state.
The small hacks that matter
Things I've learned after three van builds:
- Non-slip shelf liner in every drawer and cabinet. Costs $10 per van. Stops everything from sliding.
- Silicone trivets instead of metal. Don't rattle, stack flat, handle heat better.
- Tall narrow containers beat short wide ones. They survive tilts better and use vertical space efficiently.
- Latching cabinets, not magnetic. Magnetic latches fail at 3-degree tilts. Real mechanical latches hold through anything.
- Velcro straps on everything that might tip. Olive oil bottle, vinegar, tall glass jars — a $3 Velcro strap to a cabinet wall saves a disaster.
- Label everything. Six months in, you won't remember which jar is salt and which is sugar. Label with tape or a dedicated labeler.
What to skip
Things that look smart in YouTube tours but don't work:
- Glass storage jars for everything. Heavy, breakable, marginal visibility benefit. Use plastic for bulk storage and reserve glass for spice jars.
- Over-the-door organizers. They swing violently on dirt roads. Destroyed three in two van builds before I gave up.
- Magnetic containers stuck to the fridge exterior. The fridge vibrates, magnets slip, things fall. Bad idea.
- Open shelving. Looks great in photos. Terrible in real vans. Everything falls off.
- Wine racks. If you drink wine in a van, one or two bottles in a wedged-in Velcro strap holder is fine. Don't build infrastructure for a hobby you'll do twice.
Final word
Van kitchen storage is about discipline, not product purchases. The right bins, the right racks, the right drawer organizers matter less than the habit of immediately putting things back where they go, culling what you don't use, and never treating the counter as long-term storage. A $30 Gas One butane stove in an organized van is a better kitchen than a $500 induction cooktop in chaos.
Start with the vertical-space principle, add gasketed bins for dry goods, magnetic spice rack on a wall, nesting cookware, and a single organized utensil drawer. That's a complete van kitchen storage system for $200. Everything beyond that is marginal improvement.
See our van kitchen layouts guide for how storage interacts with the physical layout of your galley, and the van pantry staples guide for what to actually put in the bins.
FAQ
What's the best storage for van kitchen dry goods? Gasketed plastic bins with latching lids. The Iris Weathertight Set at $119 for six bins is the budget pick; Front Runner Wolf Pack Pro at $69 per bin is the premium overlander choice. Both protect contents from dust, moisture, and road vibration.
How do I keep spices from falling off in a van? The best solution is a wall-mounted magnetic spice rack like the Gneiss Spice system. Neodymium magnets hold the jars securely even on washboard roads. Mount inside a cabinet door for extra protection.
Do van cabinets need child latches? Van cabinets need real mechanical latches, not just magnetic closures. Magnetic closures fail at the 3-degree tilts you routinely encounter when parking on uneven ground, and contents spill. Positive mechanical latches (either pushbutton or roller) are mandatory for any cabinet that contains heavy or breakable items.
Where should I store knives in a van? On a magnetic knife strip mounted on a wall at eye level (not directly above the cook), in an in-drawer knife block, or individually with blade guards. Never loose in a drawer — loose knives are dangerous when the van brakes or turns suddenly.
How do I organize a van fridge? Heavy items in the bottom for center of gravity, soft items in the top for visibility, everything in rigid containers to prevent spilling, and use basket dividers in top-opening fridges to keep zones stable. See the Dometic CFX3 35 review for specific organization examples.
Is open shelving practical in a van kitchen? No. Open shelving looks good in photos but fails in real vans — items fall during rough roads, dust accumulates, and contents are visible when you don't want them to be. Use closed cabinets with proper latches for everything.
More in Layout Guides

Van Kitchen Layout Guide: Small Space, Real Kitchen
The five functional zones of a van kitchen, how they scale from cargo van to skoolie, and the layout mistakes that kill first-time builds.
Van Kitchen Ventilation: Fans, Hoods, and Why It Matters
Why every serious van kitchen needs active ventilation, the difference between MaxxFans and rangehoods, and how to install a 300 CFM hood that actually works.

How to Cool a Van Without AC: 12 Strategies That Actually Work
Insulation, ventilation, reflective covers, parking strategy, and the fans worth buying — the 12 ways to keep a van under 80°F without burning 800W on air conditioning.