Van Knife Storage and Safety
Why loose knives in a moving van are dangerous, the four ways to mount a knife block in a galley, and the magnetic strip vs in-drawer block decision tree.
Why loose knives in a van are a real problem
A kitchen knife that lives loose in a drawer during driving is a safety issue that most first-time van builders discover the wrong way. Every time the van goes over a speed bump, takes a corner, or hits a patch of washboard gravel, a loose chef's knife shifts. It slides across the drawer, it lodges under other utensils, it hits the drawer wall, and eventually — usually when someone is reaching in to grab something else — it rotates and bites. I have personally pulled a 7-inch santoku out of a van silverware drawer by the blade at a gas station in Wyoming. That is how this category of injury happens.
This guide walks through the four knife storage methods that actually work in a van kitchen, the reasons to pick each one, and a few specific mistakes to avoid. If you are deciding right now between a magnetic strip and an in-drawer block for your build, skip to the comparison table near the end.
The four methods that work
A moving vehicle is not a standard kitchen. Every storage method has to hold knives in place during lateral acceleration, vertical bounce, and long vibration sessions, and every method has to keep the edge safe from both the knife owner and anyone else reaching into the space. There are four approaches that actually meet this bar.
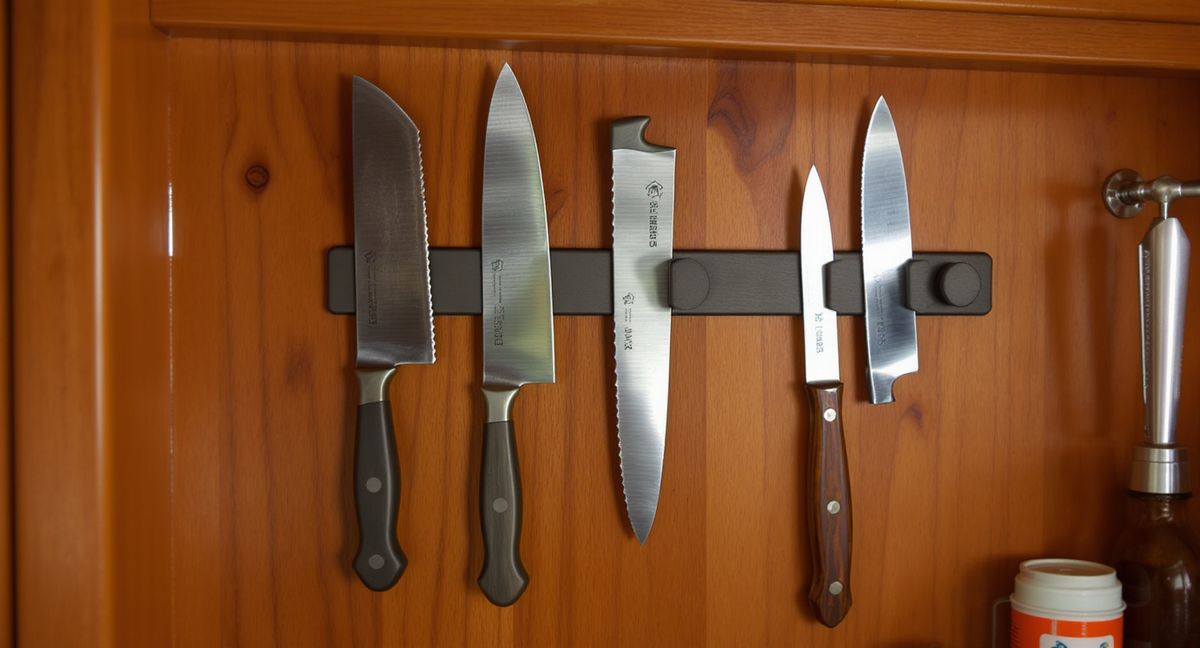
1. Wall-mounted magnetic strip
A magnetic strip screwed into the side of a cabinet or onto the wall holds knives by their blades. Gravity does most of the work; the magnet just resists horizontal slide. In a van, you mount the strip low and in a protected corner — under an upper cabinet, inside a lower cabinet that opens forward, or behind a curtain that stays closed during driving.
Pros: fastest access (grab and go), visible inventory (you know what you own), no drawer space consumed, protects the edge from contact with other utensils.
Cons: blades are exposed to humidity (carbon steel knives will rust if you leave them wet), blades are visible (not ideal if the van is also a daily driver with passengers), knives can rattle against the strip on rough roads unless the magnet is strong enough.
Best for: carbon steel knife sets that get wiped dry after every use, front-galley builds where the strip lives in a sheltered cabinet, full-time cooks who use the knife block multiple times a day.
How to mount: Use a magnetic strip rated for kitchen use (12–18 inches, rare-earth magnets, screw-mounted not adhesive — adhesive fails in temperature swings). Drill into solid wood, not thin paneling. Place at eye level inside a cabinet that stays closed during driving, or under the lip of an upper cabinet where the closed door traps the knives in place.
2. In-drawer knife block
An in-drawer knife block is a wooden insert that lives inside a kitchen drawer, with angled slots that hold each knife blade-down. The drawer closes over the top, which means the knives are invisible and completely enclosed during driving. This is the most secure method for a van.
Pros: knives are fully enclosed during driving (zero injury risk to anyone reaching into the drawer), protects the edge, keeps dust off, works with stainless or carbon steel knives, works in any drawer depth, adds zero height above counter.
Cons: consumes drawer space (typically the entire drawer), slower access than a magnetic strip, limited by drawer dimensions (some large chef's knives won't fit).
Best for: every van kitchen that has a dedicated drawer to spare, families with kids or pets in the van, any build where the knives live in a cabinet people reach into for other things.
How to install: buy an in-drawer block sized to your drawer interior. Good options include the Joseph Joseph CounterStore and any number of bamboo inserts on Amazon and Walmart. Place a layer of drawer liner underneath to prevent the block from sliding during driving, then add two small wooden wedges or L-brackets to lock the block against the drawer sides. The block itself should not move during lateral acceleration.
3. Knife roll / knife bag
A canvas or leather knife roll is the traditional chef's way to transport knives: each knife slides into its own sleeve, the roll is tied shut, and the whole package lives in a drawer or on a shelf. For weekend-only vans or builds where the knives are only used at camp and not during driving, a knife roll is the simplest possible storage.
Pros: zero install, knife-safe during transport, compact, familiar to anyone who has worked in a commercial kitchen.
Cons: slower access than either of the above (untie, unroll, pick, re-roll), canvas eventually absorbs food oils and needs replacement, knives can slide within the sleeve on washboard if the roll is not tightly tied.
Best for: weekend warrior builds, hybrid car-camping setups, anyone who owns high-end knives and wants them protected during transport.
4. Sheath-per-blade (the minimalist answer)
A simple blade sheath — the plastic or silicone sleeve that comes with some knives, or an aftermarket EDC-style sheath — lets individual knives live anywhere in the kitchen. The sheathed knife can live in the utensil drawer alongside spatulas and tongs without cutting anything.
Pros: cheapest ($5–$15 per knife), zero install, infinitely flexible.
Cons: sheaths get lost, adds a step every time you put a knife away, not as secure as an in-drawer block or a tied knife roll, cheap sheaths can fall off during driving.
Best for: minimalist builds with one or two knives total, anyone using a single chef's knife and a single paring knife.
What does NOT work
A few storage methods look fine in a house but fail in a van. Skip these:
Countertop knife blocks. The classic upright wooden block on the counter is a nonstarter in a van. The first hard corner tips it over; the second one launches it. Even if you strap it down, the knives themselves slide upward out of their slots during lateral acceleration. Countertop blocks belong in houses, not vehicles.
Loose in a utensil drawer. Already covered. Do not do this. If you have ever reached into a silverware drawer to grab a spoon and brushed the edge of a chef's knife that migrated from wherever you put it — you know.
Edge-down in a mug or pitcher. A common Pinterest hack for small apartments: stick the knives blade-down in a ceramic jar. In a van, the jar tips, the knives fall, and the edge chips against the ceramic even when the system works. Skip.
Adhesive magnetic strips. They fail. Every adhesive mount fails eventually in a vehicle because the temperature swings between winter cold and summer dashboard heat break the bond. Screw mount only.
Wall-mounted blocks screwed into thin paneling. If the paneling is less than 3/8 inch thick, the screws will tear out under vibration loads. Mount into framing, into a solid cabinet side, or into a backing plate you added for the purpose.
The comparison table
| Method | Safety | Access speed | Drawer use | Best for | |---|---|---|---|---| | Magnetic strip | High (if enclosed) | Fast | None | Cooks who use knives multiple times daily | | In-drawer block | Highest | Medium | Entire drawer | Family builds, full-timers | | Knife roll | Medium | Slow | Shelf or drawer | Weekend warriors | | Sheath-per-blade | Medium | Fast | Shared drawer | 1-2 knife minimalists |
The recommended knife kit for a van
A van kitchen does not need eight knives. It needs two, maybe three. The argument for a minimal set is not space — it is that more knives means more chances for an edge to go loose and become a problem.
Two-knife kit: a 7-inch or 8-inch chef's knife plus a 3-inch paring knife. The chef's knife handles every slice, dice, chop, and break-down task. The paring knife handles small precision work. That is it.
Three-knife kit: add a serrated bread knife or a boning knife if you bake real bread in the van or butcher whole chickens.
Recommended brands: Victorinox Fibrox for durability and cheap replacement (chef's knives under $50, lifetime warranty, used in pro kitchens worldwide), Opinel for minimalist folding options (beech handle, carbon steel blade, under $20), or MAC for a mid-premium pick. Avoid any knife set under $50 for a full kit — the steel is usually too soft to hold an edge and the handles are often injection-molded with poor ergonomics.
Sharpening in a van
Knives go dull. A dull knife is more dangerous than a sharp one because dull blades require more pressure, which means more slip-and-cut incidents. In a van, you need a sharpening plan.
The minimalist answer: a pull-through carbide sharpener. Costs $10, works in 10 seconds, wears out the blade faster than proper sharpening but adequate for medium-hard knives like Victorinox. Fine for weekend use.
The correct answer: a double-sided whetstone (400/1000 grit or 1000/6000 grit depending on how sharp you want to get) plus five minutes of practice. Whetstones work in a van because they need only a flat surface and a little water; the tricky part is learning the motion, which takes about an hour on YouTube.
Avoid: pull-through steel wheel sharpeners that grind metal aggressively (they eat the knife in a year), electric sharpeners (too much power draw, too bulky), and "honing steels" sold as "sharpeners" (they realign the edge but do not sharpen a dull knife).
Final word
Knife safety in a van is mostly about enclosure during driving. Whatever method you pick, the test is simple: grab the van by the roof, rock it side to side, and see if the knives move. If they shift, the mounting is not secure enough. Fix it before your next drive, not after.
See the van kitchen storage solutions guide for the broader storage system that the knife block fits into, and the van cooking safety guide for the other side of kitchen risk (fire, burns, propane).
More in Layout Guides
Van Kitchen Layout Guide: Small Space, Real Kitchen
The five functional zones of a van kitchen, how they scale from cargo van to skoolie, and the layout mistakes that kill first-time builds.
Van Kitchen Storage Solutions That Actually Work
Pantry bins, magnetic spice racks, drawer systems, and the organization hacks that survive washboard roads.
Van Kitchen Ventilation: Fans, Hoods, and Why It Matters
Why every serious van kitchen needs active ventilation, the difference between MaxxFans and rangehoods, and how to install a 300 CFM hood that actually works.