How to Make Real Espresso in a Van (Without a $1,500 Machine)
The three methods that actually produce real espresso in a van kitchen — the Wacaco Picopresso lever press, the Bialetti stovetop moka, and the AeroPress with a Prismo adapter. Plus the grinder question that matters more than the machine.
Can you actually make real espresso in a van?
Short answer: yes, if you are honest about what "real espresso" means. Real espresso is pressurized extraction — 9 bars of water pressure driven through 18 grams of finely ground coffee in about 25 seconds. That definition matters because it tells you what is possible in a van and what is not.
What you cannot do in a van: run a 1500W plumbed commercial-style espresso machine with a boiler that needs 20 minutes to heat up. That setup costs $1,500+, draws power your battery cannot spare, and needs plumbed water your kitchen probably does not have. Those are the machines coffee snobs mean when they say "real espresso," and they are the wrong tool for van life.
What you absolutely can do: pull 9-bar, properly extracted, rich, crema-topped shots that would hold up blind against a cafe shot — using a manual lever-press portable espresso maker that costs $80, weighs under a pound, and uses hot water you already have for anything else. That is what this guide is about.
Below are the three methods that actually work for van espresso, in order from most real to least real, plus the grinder question (which matters more than the machine), plus how to adapt each method to induction, butane, and propane heat sources. If you are deciding between the Wacaco Picopresso and the Bialetti Moka Express for your next trip, skip to the head-to-head at the end.
Method 1: Manual lever-press (the real espresso answer)
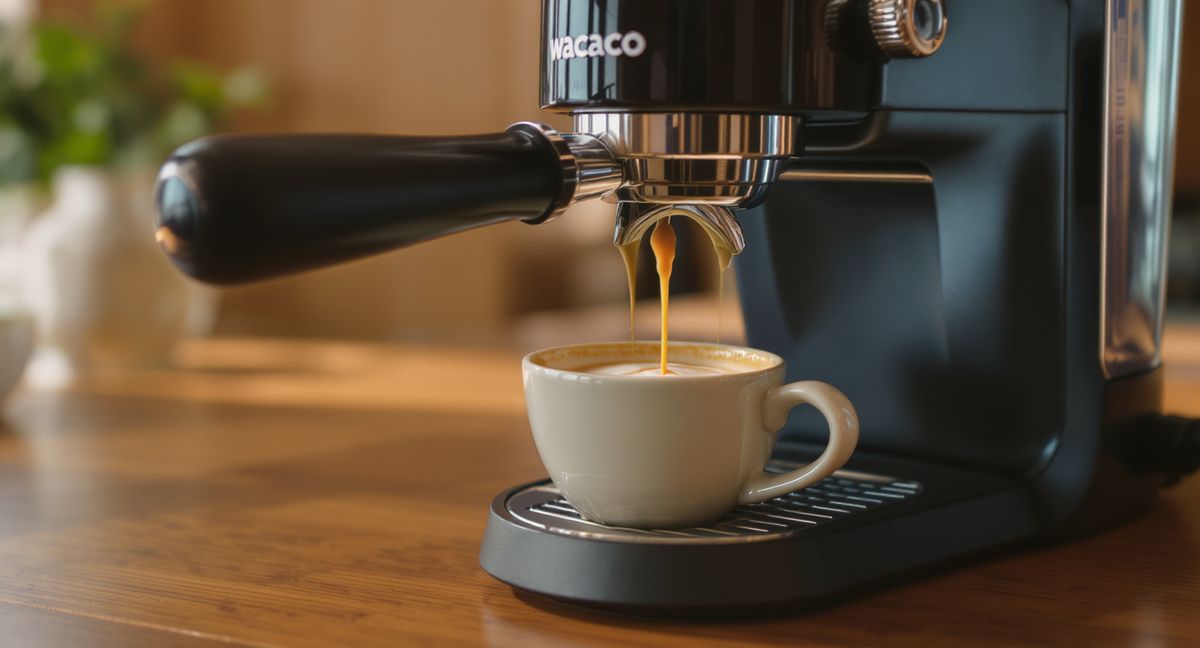
The best van espresso — real espresso, real crema, real 9-bar extraction — comes from a manual lever-press espresso maker. The category has three main players: the Wacaco Nanopresso, the Wacaco Picopresso, and the Flair Neo Flex. They all work on the same principle: you grind fine, dose the basket, tamp, add hot water from a kettle, and press the lever by hand to generate the 9 bars of pressure that define espresso.
Gear cost: $60–$100 for the maker, plus $90–$160 for a decent hand grinder (see grinder section below). Total real-espresso setup cost: about $150–$260.
Workflow, start to finish:
- Heat water to about 93°C (200°F) on whatever heat source you have — butane kettle, induction kettle, a saucepan on a camp stove. You do not need a thermometer; water just off the boil is close enough.
- Grind 16–18 grams of coffee at a fine espresso setting (finer than pour-over, about the texture of powdered sugar). This is where most beginners go wrong — the grind has to be fine enough that the press builds real pressure.
- Dose the ground coffee into the basket, level with a finger, and tamp firmly. Even pressure, flat surface.
- Pour 60ml of hot water into the reservoir, screw on the brew chamber, invert over a cup, and press the lever in long slow strokes. You are trying for a 25-second extraction time. If it gushes out in 10 seconds, the grind is too coarse. If it takes 45 seconds of heavy pressing, the grind is too fine.
- Taste. Adjust grind size next shot if needed.
The Picopresso is my personal pick for van use. It has a larger 18-gram basket, better pressure consistency than the older Nanopresso, and it nests into a compact case that lives in a drawer or on a shelf without any custom storage. The shots it pulls are genuinely good — not "good for a van," but good full stop. Blind, side-by-side against a cafe shot from a decent home machine, the Picopresso is in the same league.
Advantages: real 9-bar extraction, real crema, fast once the water is hot (under two minutes from grind to shot), no electricity, no plumbing, easy cleanup (rinse the basket, wipe the gasket), compact storage. Works with any heat source because the espresso maker itself is unheated.
Disadvantages: one shot at a time (making two drinks is two workflows back-to-back), requires a good hand grinder (see below), requires learning the grind-dose-tamp-press routine, cannot make long drinks directly without rebrewing.
Method 2: The stovetop moka pot (the traditional van answer)
The moka pot is the pre-van-life van-life espresso maker. It has been in Italian kitchens for a hundred years and in camp kitchens for almost as long. The Bialetti Moka Express is the canonical example — aluminum, hexagonal, recognizable from across a campsite. The 6-cup version makes about 10 oz of concentrated coffee, enough for two people.
A moka pot makes concentrated, espresso-style coffee, but it is not real espresso. The pressure is about 1.5 bars, not 9 bars. The extraction is slower, hotter, and more forgiving than real espresso, which means the flavor is more bitter and less sweet. Some people love moka pot coffee exactly because it tastes different from espresso. Some people dismiss it for exactly the same reason. Both are defensible opinions.
Gear cost: $30–$40 for a Bialetti Moka Express 6-cup. Add a hand grinder for $90–$160 if you do not already have one (you can also buy pre-ground, but fresh-ground is substantially better).
Workflow:
- Fill the bottom chamber with cold water to the safety valve line.
- Fill the filter basket with medium-fine ground coffee (a hair coarser than real espresso grind, about the texture of table salt). Do not tamp — tamping increases pressure beyond what the moka pot is designed for and can cause the safety valve to blow.
- Assemble and place on medium heat. Butane and propane are faster than induction here because the wide flame heats the bottom chamber evenly. Induction works fine as long as the pot has a stainless steel base (most do not — the classic Bialetti Moka Express is aluminum and will not work on induction unless placed on an adapter plate).
- When the coffee starts flowing into the top chamber (about 4–5 minutes from cold), wait until you hear the sputtering sound, then remove from heat immediately. Running the pot too long scorches the coffee and ruins the shot.
- Serve into preheated cups. Drink immediately — moka pot coffee goes cold and bitter if it sits.
The biggest mistake beginners make is over-extracting by leaving the pot on the heat too long. The second biggest is tamping, which is what you do for real espresso but not for moka. The third is using bad coffee — moka pots amplify what is in the beans, so stale or bitter coffee tastes worse through a moka than through a pour-over.
Advantages: cheap, durable (aluminum pots last literal decades), no electricity, makes multiple servings at once, familiar workflow if you already make moka at home, works on propane and butane with no adaptation.
Disadvantages: not real 9-bar espresso, the aluminum Bialetti does not work on induction (the stainless Bialetti Venus does), slower than the lever-press methods, the flavor profile is polarizing.
Method 3: AeroPress with an espresso adapter (the hack)
The AeroPress is not really an espresso maker, but with a fine grind, a firm press, and optional pressure adapters like the Fellow Prismo, it produces a concentrated espresso-like shot that works for lattes and cappuccinos when you need one fast.
This is a legitimate third option for van life because the AeroPress is a pan-dimensional workhorse — it makes drip-style coffee, French press-style coffee, and espresso-adjacent shots from the same $45 device. If you are already bringing one for regular coffee (see the van life coffee setup guide for why you probably should), adding a Prismo adapter for $25 gives you quasi-espresso on no extra gear.
The catch: the pressure the AeroPress plus Prismo generates is about 2 bars — better than a moka pot, nowhere near real espresso. The crema is thin. The shot is drinkable, works in a latte, but it is not the same as what the Picopresso produces. Think of the AeroPress-Prismo combo as "a better moka" rather than "as good as a lever press."
The grinder question (it matters more than the machine)
Any espresso method, real or quasi, is bottlenecked by the grinder. Cheap blade grinders produce inconsistent particle sizes — some dust, some chunks, no middle — and espresso extraction is incredibly sensitive to grind uniformity. A $30 blade grinder ruins an $80 Picopresso. A $100 burr grinder makes both the Picopresso and the moka pot noticeably better.
For van use, the Hario Skerton Pro is the entry pick at around $60 — conical ceramic burrs, consistent grind, hand crank, no power. For serious espresso work, a 1Zpresso JX-Pro or a Timemore Chestnut C2 at $130–$160 is the step up: tighter tolerances, finer adjustment, faster grinding, and demonstrably better shot consistency.
Whatever you buy, make sure it adjusts fine enough for espresso. Some hand grinders cap out at pour-over grind and cannot grind fine enough for real espresso work — check specs before buying.
Heat source compatibility
Butane (Gas One GS-3000 etc.): compatible with every method. Boil water in a kettle, use the hot water with the Picopresso, or put the moka pot directly on the burner. Butane's fast heat-up and easy deployment make it the most compatible espresso heat source for van life.
Propane: same as butane. Works with kettle-boil methods and direct-on-burner moka pot brewing.
Induction: works with kettle-boil methods (fast), works with a stainless steel moka pot (the Bialetti Venus, NOT the aluminum Moka Express), does not work with the classic aluminum moka pot unless you use a magnetic adapter disc.
Campfire/wood: works with the moka pot in a pinch, works with kettle-boil methods for lever press, not recommended for the AeroPress (too much heat variation).
Head-to-head: Picopresso vs Moka Express for van life
If you care about shot quality and are willing to learn the grind-tamp-press workflow, the Picopresso wins. It produces real espresso, it works on any heat source, it is the same price as a moka pot plus a better grinder, and the cleanup is faster.
If you care about tradition, you are making coffee for two people at once, and you do not want to learn a new workflow, the moka pot wins. It is the Italian grandmother answer to van espresso. It makes multiple drinks at once, the aluminum version will outlast the van, and the flavor profile, if you like it, is distinctive.
If you already own an AeroPress and do not make espresso drinks often, the Prismo adapter is the cheapest way to get quasi-espresso into your rotation without adding gear.
One combination to avoid: any real espresso setup without a burr grinder. The grinder is the difference between a shot that is actually good and a shot that is just hot bitter coffee. Spend the grinder money or skip the espresso category entirely.
See the van life coffee setup guide for the five regular (non-espresso) coffee methods that work in vans, and the induction vs butane vs propane guide for the heat source tradeoffs that affect every coffee method.
More in Meal Prep
5 One-Pot Meals for Life on the Road
Real recipes for van kitchens — fast, delicious, one pan, and built around shelf-stable pantries.
The Van Pantry: 25 Shelf-Stable Staples for Real Meals
The exact pantry I build out every time I restock — 25 ingredients that yield 30+ meals without refrigeration.
Coffee in a Van: The Complete Setup Guide
Espresso, pour-over, French press, AeroPress, or moka pot — the five real coffee methods that work in 80 square feet, what each costs, and which one fits your routine.